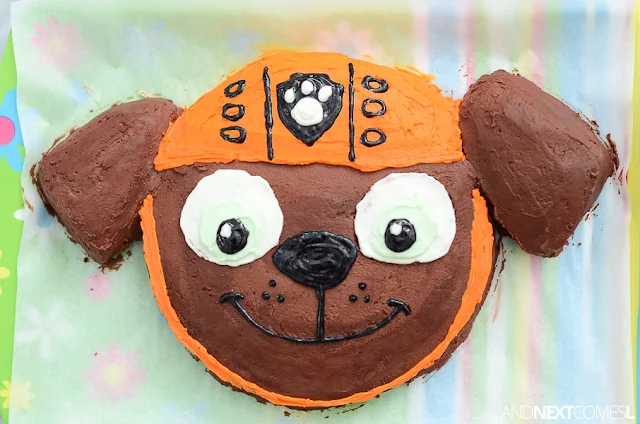
I already confessed that I'm no baker, but I do love making a custom cake for my kids' birthdays every year! While my oldest opted for a Pikachu cake this year, my youngest chose his favorite Paw Patrol character: Zuma!
This Paw Patrol birthday cake was super easy to make and turned out fabulous! I think I really outdid myself this year on these cakes. I definitely set the bar too high for 2017's birthday cakes.
Just like the Pikachu cake, I promise that this Zuma cake is easy to make.
Here's how to make a Paw Patrol birthday cake.
This post contains affiliate links.
What You'll Need to Make a Paw Patrol Zuma Cake
Here is what you'll need to make this easy Zuma cake (or really any pup from Paw Patrol for that matter):
- Cake mix or your favorite homemade cake recipe
- 2 9-inch round cake pans
- Chocolate icing or your favorite homemade chocolate icing recipe
- Piping bag
- Icing spatula or butter knife
- Gel food coloring
- Black decorating icing tube - I actually used this sparkle gel because that's all I could find locally.
- Knife to cut the cake
Having said all that, use what you prefer.
Bake the cake as the recipe calls for. You will need to make two 9-inch round cakes. Let cool completely before assembling the cake.
How to Make a Zuma Cake for a Paw Patrol Birthday Party
Keep in mind that you could do the following process for any Paw Patrol character. Zuma just happens to be K's favorite of the pups!
3. Place the triangular shaped cake pieces at the side of the round cake to form the basic shape of Zuma.
4. Make your icing (skip if using store bought). Do not add cocoa powder yet as you need to save a some white icing (probably a cup or so should do) in a separate container. You will use this batch of icing for finishing details like helmet and eyes. Once you have reserved some white icing, add cocoa powder to make the chocolate icing.
5. Add a generous layer of chocolate icing to the entire shape of the cake and along all edges, except for the top of Zuma's head. Leave room for the orange helmet.
6. Chill the cake in the fridge for about 20 minutes.
7. Separate the reserved batch of icing into three containers. Put 2/3 of the icing into one bowl and then split the remaining 1/3 into two other bowls.
8. Add some drops of yellow and red food coloring to the largest portion of white icing and mix until the color is evenly distributed. It should be a bright orange color for Zuma's helmet.
9. Add some drops of yellow and blue food coloring to a small portion of white icing and mix until the color is evenly distributed. It should be a nice green color for Zuma's eyes.
10. Add an additional layer of chocolate icing to the cake if needed. Otherwise, run a butter knife or cake knife over the entire cake to smooth the icing as best as you can. Optional: lick the icing off the knife to reward yourself for such an amazing job! You deserve it!
11. Use a piping bag and cake knife to add orange icing to make Zuma's helmet.
11. Use a piping bag and cake knife to add orange icing to make Zuma's helmet.
12. Use a piping bag to add white icing to Zuma's head to make the eyes
13. Use a piping bag to add green icing to Zuma's eyes.
9. Add black details using the decorating icing tube.
10. Use a piping bag (or use a small plastic zipper seal bag and snip one corner) to add the white dots to the eyes and paw print to the helmet using the icing you put aside earlier.
11. Chill until serving time.
10. Use a piping bag (or use a small plastic zipper seal bag and snip one corner) to add the white dots to the eyes and paw print to the helmet using the icing you put aside earlier.
11. Chill until serving time.


