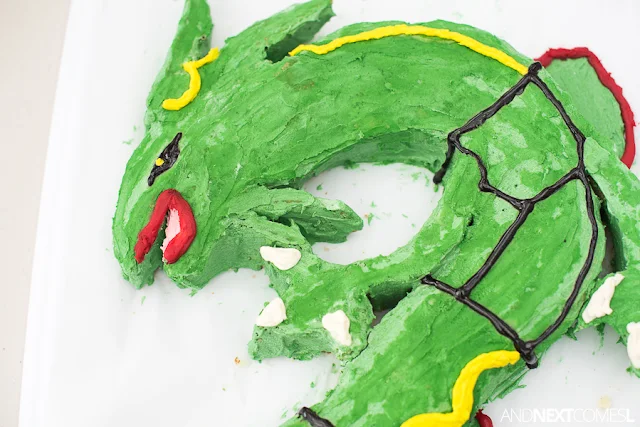
Thinking of making a Pokemon birthday cake for one of your kids? This Rayquaza Pokemon cake tutorial is super easy. Find out how to make a Rayquaza birthday cake below.
I'm going to go out on a limb and say that this Rayquaza birthday cake was one of the hardest cakes I have made over the years. I could say some of my first few cakes were hard, but that's simply because I didn't really have any experience making complex cakes yet.
Oh wait...maybe J's 5th birthday cake where it had an actual number 5 embedded in the middle of each slice of cake was one of the most difficult. But that one was easy to decorate at least...
Annnnnyway, my oldest had his heart set on a Rayquaza cake for his 9th birthday and I was determined to make it happen.
And happen it did.
I mean look at this BEAST.
This cake may not look super pretty up close, but whatever, I love how it turned out. And so did J. He absolutely loved it!
What You'll Need to Make this Rayquaza Pokemon Cake
When my son J requested a Rayquaza cake for his 9th birthday, I wasn't entirely sure how I was going to make it a reality. I figured that I could start with a snake shape and then hope for the best. So that's what I did. Here's what you'll need to make this Pokemon birthday cake:
- Cake mix or your favorite homemade cake recipe (go with whatever is easiest!)
- Two 9 inch round cake pans
- Icing or your favorite homemade icing recipe
- Piping bag
- Icing spatula or butter knife
- Food coloring: green and yellow
- Red decorating icing tube
- Black decorating icing tube
- Knife to cut the cake
- Parchment paper
- Toothpick
- A round cookie cutter, bowl, or cup that has a small diameter than the 9 inch cake pan
Here's what we're going to make:
How to Make a Rayquaza Birthday Cake
1. After the two cakes have cooled, transfer to a cutting board or somewhere to cut the cake. Do not place the cakes on the tray you'll be serving it on yet. We need to do some major cutting first!
2. Using a round object smaller than the cake pan, cut out the centers of both cakes. These inside pieces will become the hands, arms, ears, and chin whisker thingies. Set the inside pieces aside.
3. Cut the outside circular pieces into smaller pieces and start assembling a snake shape on a serving tray lined with parchment paper (we need to line it as some of the details will be iced on the parchment to give some dimension and depth to the cake). The cut pieces don't need to fit together perfectly. That's what icing is for, right? *wink wink*
4. Cut a mouth at one end of your snake shape.
5. Once you have your basic snake shape assembled, start cutting and hacking away on those inside pieces you set aside in step 2. Use a google image of Rayquaza to help you figure out the basic shapes you need. It's basically two slender triangles for his ears and two more smaller ones for his chin whiskers. His arms are a small curvy bit and you'll need two three pronged blobs for his hands. Assemble these pieces to the cake on the serving tray. <-- Good descriptions or what, right? I mean, I'm not striving for perfection here. Just a cool looking cake.
6. Make your icing (skip if using store bought). Split into three portions (one portion should be about 90%, one 8%, and one 2%).
7. Add a copious amount of drops of green food coloring to the largest portion of icing and mix until the color is evenly distributed. Repeat for the yellow using the medium portion. Leave the remaining small portion white.
8. Add a generous layer of green icing to the entire shape of the cake and along all edges. I'm serious...be generous, especially if your cake has some gaps here and there like mine did.
9. Chill the cake in the fridge for about 20 minutes.
10. Add an additional layer of green icing if needed. Otherwise, run a butter knife or cake knife over the entire cake to smooth the icing as best as you can. Be sure to save some green icing for other details.
11. Use the leftover green icing from step 10 to draw some of Rayquaza's fins onto the parchment paper.
12. Use the red icing tube to draw lips and outline the green fins you made in step 11.
13. Use the black icing tube to draw an eye and some body sections. Use your inspiration image as a guide or my photos here. Note: I did a terrible job of counting the number of sections for his body, but did anyone notice? Nope!
14. Use a piping bag filled with yellow icing to draw some of the details along Rayquaza's back and body. Again, use your inspiration image or the photos here as a guide. Be sure to put a yellow dot inside his eye too!
15. Use a piping bag filled with the white icing to draw claws onto Rayquaza's hands.
16. Chill until serving time.
Here are some closer up shots of some of his details. You'll notice I did put a bit of pink inside Rayquaza's mouth. That's because I was also working on this Patrick birthday cake at the same time and had some leftover pink icing.


